[Tutorial] How to install FX Foundry on GIMP (Mac OS Lion)

Tutorial by Mike Dee.

“The Gimp filters from FX-Foundry (100 + and excellent) also work well in

Mac OS X PPC & Intel Macs (Tiger & Leopard) but do take a little effort

in Mac OS to get Gimp to register the “FX-Foundry” menu.

Steps:

(X11 for Mac OS X must be pre-installed)

Install stable “Gimp on OS X” 2.6.6 for Tiger or Leopard:

<http://gimp.lisanet.de/Website/Download.html>

DL the Gimp Help files for Mac OS X (same link as above).

Once The Gimp is installed on your Mac:

DL the FX Foundry filters: <http://gimpfx-foundry.sourceforge.net/>

Unzip package and copy the contents to:

/Users/<your-username>/.gimp-2.6/scripts

The folder “.gimp-2.6″ in your user folder is a hidden folder, one easy

method to open this folder is to launch the “Terminal” from inside the Mac

“Utilities” folder and type “ls -a” to “see” the invisible folders inside

your user folder, type “open .gimp-2.6″ (without quotes) to open the

gimp-2.6 folder. Inside this you will see the “scripts” folder.

Copy the contents of the downloaded fx-foundry zip file into the scripts

folder of this “hidden” folder.

To get The Gimp to “see” the new scripts:

Launch The Gimp.

From the “Edit” menu, choose “Preferences”

In the left-hand column, go down to “Folders”

Click small triangle “arrow-head” to left of “Folders” icon

In list below this, click “Scripts”

To the right in dialog you should see the header “Script-Fu Folders”

Below this a row of seemingly “grayed-out) icons

Click the left-most one (looks lick a document page with a down-turned

corner)

A insertion point should appear in field to the right of this.

Type “/Users/<your-username>/.gimp-2.6/Scripts” (without quotes)

Click folder to the right of this text entry field.

Its kind of odd but clicking that folder icon opens the hidden folder and

enters the path to the Scripts folder into the Folder list below in the

dialog (where you need it to actually go). Click OK in the dialog to

dismiss it.

Restart the Gimp.

You should now see a new menu, “FX-Foundry” and your new filters will be

available to enjoy.

I’m relaying these steps because:

a) I couldn’t find them for Mac OS X in a search engine (I did look).

b) Its fresh in my mind (installed them today) :-)

c) They work just as well for the Mac as for Linux and Windows, Yay!

d) Installing them on the Mac was a tad difficult in comparison to other

platforms (Gimp couldn’t see the “hidden” user folder without being told

how to find it).

dee”

P.S.: On Mac OS X Lion, the “gimp-2.6″ “doesn’t exist”, you should use “/Users/YourUsername/Library/Application Support/Gimp/Scripts” instead.

[Tip] Solution for ZTE Broadband Modems on Mac OS X Lion 10.7

Solution found! Thanks for sharing Mark! My model is a MF626 and my ISP is vivo (Brazil), but that Vodafone ZTE Driver might work on other ZTE Broadband Modem models and ISPs too. Download the Driver here: http://is.gd/FTaImq

Install it, but don’t use the Vodafone interface, use the Mac OS X Lion Network Preferences, just set up a new connection and you’re ready to go : )

Take a look on the comments below for more detailed information!

[Howto] For Mac users: Share Internet through Wi-Fi with your PS3 without a router (Works with 3G Mobile Broadband Modems)

“Okay, so I know this thread is old, but up to last month nobody had posted a solution to using the internal airport card to share the connection so I said i’d register incase anyone else was googling endlessley to find a solution.

Turn on Internet sharing:

select the network you want to share and share it via airport and give your network a name… set up a 5 digit WEP key if you want protection.

open terminal and type ifconfig en1

This will give you your router number, mine was 10.0.2.1, it will be listed next to the word inet

next type dig, this will give you your ISP’s DNS numbers (at the very bottom, next to the word server)

On your PS3 open the network settings, scan for your new network, enter the WEP key and configure the IP manually.

Under IP type the router number but add a digit to the last number, in other words, my router was 10.0.2.1, so I assigned my PS3 the IP 10.0.2.2

use the standard subnet mask of 255.255.0.0

enter the router number you found (10.0.2.1)

enter the DNS numbers found earlier.

MTU = Auto

Proxy Server = Do Not Use

UPnP = doesnt make a difference

and thats it, your done… im using my PS3 with my 3G mobile broadband shared via airport.

EDIT: After a PM I realised I completely left out the Airport settings part.

In Airport settings under TCP/IP select configure IPv4 via DHCP, and under DNS add your ISP’s DNS numbers that you found earlier.”

[Howto] “Share the Internet from your Mac via Wi-Fi” (Also works with 3G connection)

This Howto was Google Translated from Brazilian to English.

By Rodrigo Muniz

“Suppose you bought an iMac that will stay in the office connected to cable broadband. All you need wireless access to the house over a notebook and a smartphone. Normally what would you do if you had to share this connection through the house? Buy a Wi-Fi router, right?Wrong.

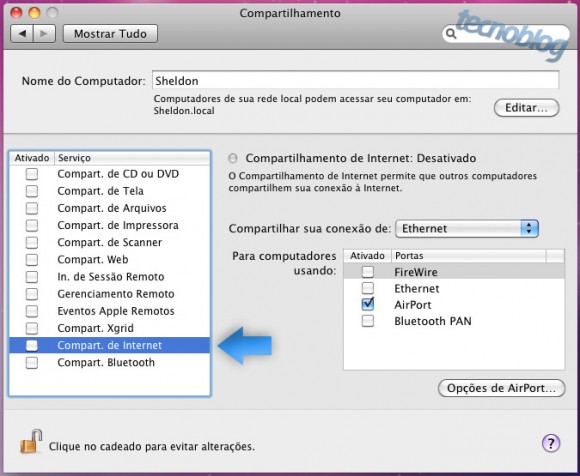
After spending all his savings on a Mac, you can think about saving. With cable connected to your Mac, open System Preferences and go to Sharing.

Internet Sharing in Mac OS | Click to enlarge 

You’ll find a list of services on the left that can be shared, one of which is the Compart.Internet. Go to him, without checking the checkbox that is located beside the name. If already checked, just to be able to disable modify the settings. On the right you probably already have the correct options to start sharing. Make sure that the list Share your connection from theEthernet option is chosen. Farther down the list displayed by using computers to enable theAirPort.

Ideally, you set a password to protect your wireless network. If you are sharing files or do not want someone snooping around your network, this step is required. On second thought, leave an open wireless network is never a good idea.

AirPort Options 

Click the AirPort Options …, name your network (by that name is that your network will be found) and enable the Enable encryption (using WEP).

Security through WEP | Click to enlarge 

Note that the password length will vary depending on the type of Extended WEP key you choose. Unfortunately, WEP is not the best, so choose to use 128-bit and enter a password, which must have 13 digits. Try using a password with digits harder to guess someone as special characters in place of some etra ¬ $. :)

Turn on sharing 

Finally activate the checkbox list on the left of the Compart. Internet. Do not be alarmed by the warning that is displayed, click and enjoy.

Bonus: Share 3G connections

This also works for sharing 3G via Wi-Fi connections, if you have a 3G modem connected to your Mac, just choose the name of the modem instead of Ethernet. Great for those who meet with clients in areas without Wi-Fi and want to make an average of offering free access.”

[Tip] FormulatePro: Edit PDFs easily on Mac OS X with this Free and Open Source app

“FormulatePro helps you open and write on PDF documents. You can fill out any PDF form document, drop in graphics, scribble with the mouse or a tablet, save and print.

FormulatePro requires Mac OS X version 10.4 Tiger or higher.”

[Tweaks] “Improving VLC Player load times of .MKV files on Leopard and Lion”

“Ever notice that MKV files load significantly slower than before in VLC on Mac OS X 10.6 (Snow Leopard)? I did, and for someone who has a lot of media files encoded in the format, it’s almost unusable to have to wait a minute while seeing the CPU on one core maxed out. The version of VLC player I have is 1.0.3, the latest as of this post. However, the issue seems to be around since at least 1.0.1 as discussed on this page:http://forum.videolan.org/viewtopic.php?f=12&t=64302&start=15

The fix is pretty simple assuming you are not scared of entering a command in the terminal:

  1. Open terminal (Applications/Utilities/Terminal.app)
  2. Copy and paste this: ‘sudo chmod a+w /usr/X11/var/cache/fontconfig’ without the quotes
  3. Enter your admin password (for most people, that’s just your current account’s password if you are an admin)
  4. Open a .MKV file and close it after it starts playing
  5. Now open any .MKV file again and things should be as snappy as before!”

[Guide] Install Ubuntu 10.10 on Macmini4,1

For reference, take a look on the Ubuntu Wiki, about Ubuntu 10.10 on Macmini4,1first, before reading/following this guide.

Download and burn the alternate CD version of Ubuntu 64 Bits:

TORRENT DOWNLOAD

http://releases.ubuntu.com/maverick/…64.iso.torrent (Torrent didn’t work for me)

TRI BOOT INSTALL

I’ll be doing a Tri Boot Install, but you can easily, with that knowledge, do a Dual or Single Boot Install.

1. Partitioning – Preparing for installation

– Boot into OS X;

– Open Bootcamp utility;

– Create a partition for Windows (will be sda3) and make it 1/3 of the disk size. Create this partition as FAT;

– Now create a partition for Ubuntu (will be sda4), also 1/3 of the disk size of course. Don’t forget to create it a little bit larger because of the extra for SWAP (will be sda5).

2. Installing Windows

In a Tri Boot Install scheme, you need to install Windows first, otherwise it will mess up MBR and give you lots of headaches.

– Boot into OS X;

– Insert your Windows DVD Install disk;

– Restart your Mini and quickly press and hold the C key until Windows starts the installation process.

3. Installing Ubuntu

– Boot into OS X;

– Insert your Ubuntu CD Install disk;

– Restart your Mini and quickly press and hold the C key until Ubuntu starts the installation process;

– Press F6. Choose noacpi and nomodeset. Press ESC and Return;

– On the installation wizard, choose manual partitioning;

– Probably, your partitions looks like the following:

sda2 – Mac OS X – hfs

sda3 – Windows – fat

sda4 – Ubuntu – fat

– Choose to edit sda4, resize it as to leave a extra for SWAP. Choose ext4 as the file system. / as the main directory for installation and mark the partition as bootable. Save and go back to the partition table;

– Now choose the empty extra space destined for SWAP. Edit it and choose SWAP as file system.

– Finish the table partitioning and begin installation.

– While in the installation process, you’ll be asked for where to install GRUB. Choose sda4, or, the same partition you’re using to install Ubuntu.

POST-INSTALLATION

You can install some multi-os bootloader to ease your life. Make a quick search on your favorite Internet search engine about “tri boot mac linux” and you’ll see some nice options.

To boot properly into Ubuntu, in the grub menu, press the E key and

edit and add the following:

Quote:

linux /boot/vmlinuz-2.6.32-24-generic root=UUID=53658b6a-2991-4a15-8e48-8ab7d4e0985c ro quiet nosplash noacpi nomodeset reboot=acpi

Press Ctrl+X to exit and boot.

Install NVIDIA Drivers from the repository to get resolution straight. Do the same for the Wireless Card. (System > Administration > Hardware Drivers)

For proper boot, restart and shutdown, log in into Ubuntu. Press Alt+F2 and Copy and Paste+Return the following (You’ll need to do this every time you update your kernel):

Quote:

gksu gedit /boot/grub/grub.cfg

Find the part that says something like the following (just around line 64. You can set it to 0 for automatic boot):

Quote:

set timeout=10

Now find the following (around line 78 ) :

Quote:

linux /boot/vmlinuz-2.6.32-24-generic root=UUID=53658b6a-2991-4a15-8e48-8ab7d4e0985c ro quiet splash

Edit and Add the following:

Quote:

linux /boot/vmlinuz-2.6.32-24-generic root=UUID=53658b6a-2991-4a15-8e48-8ab7d4e0985c ro quiet nosplash noacpi nomodeset reboot=acpi

Save and exit.

Fixing Audio and Bluetooth: here

————-

This guide was not possible without the love and caring support of the awesome Ubuntu community. Special thanks goes to:

Stevethepirate and HashBox on Ubuntu IRC Channel for helping me out with GRUB.

Yako no Kai – http://ubuntuforums.org/showthread.php?t=1323102&page=2 – for finding out how to restart Ubuntu properly.

Be well. See ya.

REFERENCES

Ubuntu Forums

Ubuntu IRC Channel

Ubuntu Wiki